Booking appointments and fitting rooms
Book a bride into a fitting room, move or cancel a visit, block off a room, and keep a waitlist.
The Calendar shows one column per fitting room. Any room takes appointments whenever the store is open; you never need a staff schedule to book. (The staff schedule is for staffing and payroll.)
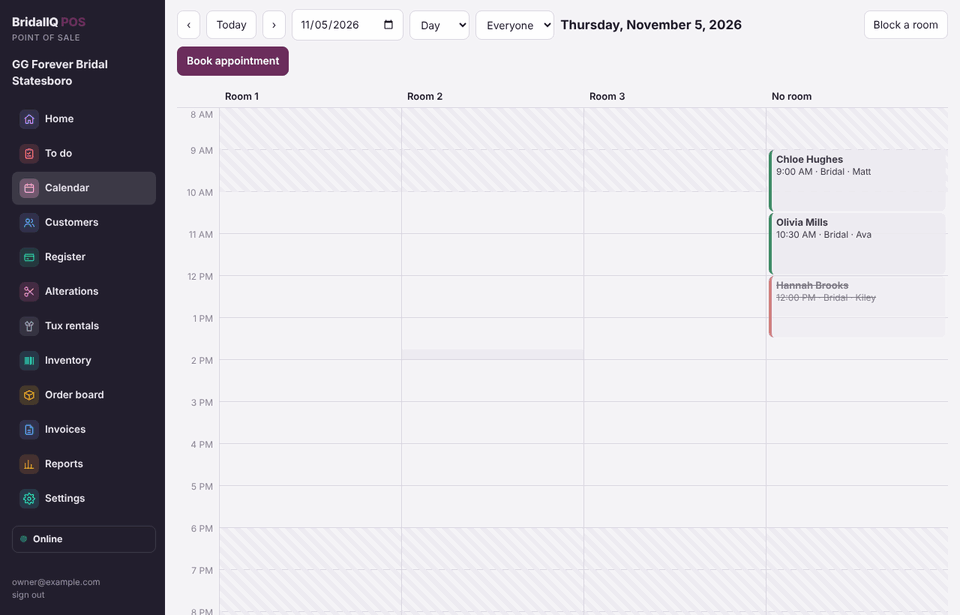
Book an appointment
- On the Calendar, press Book appointment, or click an empty time in a room.
- Search for the customer. If she is new, type her first name, last name, phone and email instead.
- Pick the type (Bridal, Bridesmaid, Prom...). The length fills in from the type; change it if you need to.
- Under Open times, click a time. It fills in the room and time for you. Only rooms that are free while the store is open show up.
- Pick a consultant if you want, add notes (budget, styles she likes, who's coming), and press Book.
Picking a consultant
The consultant list shows only the people who take that kind of appointment (set in Settings, Team, Appointment types). Change the type and the list changes with it.
- Auto-assign gives it to a free consultant who takes that type: someone on the schedule then first, then whoever has the fewest appointments that day. Nobody free? It says so and leaves it open.
- Pick someone who doesn't take that type and the POS asks before booking it anyway. Someone who's off that day (approved time off) gets a note, and Auto-assign skips her.
- The day view's note says who's working and who's off.
Start a sale, special order or layaway from her appointment
- Click her name on the calendar (day or week), or open her appointment and use the Start buttons. On a phone, open Appointments and tap her row.
- Pick Sale, Special order or Layaway.
- If she isn't checked in yet, Check her in now is ticked: her arrival time is recorded with it.
- The ticket opens at the Register already filled in: her customer record, the appointment's consultant, her wedding and its date, and a note with the visit, her budget and the appointment notes.
The ticket stays linked to the appointment, so her first payment closes that visit as Purchased and keeps the time from check-in to the sale. The register does not ask "How did she come in?". If she already has an open ticket of that kind from the same appointment, you are asked whether to open it or start another. A double tap never makes two tickets. Only people who can write tickets see the buttons. Offline, it says it needs the internet; ring up a stock sale from the Register instead.
Her customer record is the appointment's; nobody new is added. If another record has her phone or email, it is named so you can merge them in Customers.
Details your store asks for
In Settings, Appointment details to ask for (owners and managers), turn Required on or off for each detail: phone, email, wedding or event date, budget, how she heard about us, venue, her part in the wedding, consultant and your interview questions. There are three columns:
- Booking in the store: the Book appointment window asks for them and won't book without them.
- Online booking: your booking page marks them with a star and won't take the booking without them. Whatever you pick, she always gives her name and a phone or email.
- Before a sale, special order or layaway: when you start a ticket from her appointment and something is missing, a short form asks for just those. They are saved on her record and the appointment, in the history.
Out of the box nothing new is required: online booking needs her phone, like before, and nothing else anywhere. Back to how it was puts it back.
Move, change or cancel
- Click the appointment on the calendar.
- Open Move or change to change the date, time, room, associate, length or notes, then press Save changes.
- To cancel, press Cancel. If someone on the waitlist wants a time like that, the POS offers to tell her.
Day, week and month
Use the arrows or Today to move between days. Switch Day to Week to see Monday to Sunday at once, and pick one person under Everyone to see only her appointments. Click a day in the week view to open it.
Switch to Month to see the whole month. Each day shows how many appointments it has and the first few names and times in their status colors. Closed days are striped, a day with a room block has a "blocked" note, and today is outlined. The arrows move a month at a time. Click a name to open her appointment, or click the date (or + more) to open that day. On a phone each day shows colored dots and a count: tap a day to see its list under the month.
Marking an appointment
Open her appointment and press Confirmed, Check in, Purchased, Thinking, Walked, No show or Cancel. The box stays open and says what was done and when (for example "Marked confirmed ✓ 2:14 PM"), so you can do the next thing. Press Close (or Esc) when you are done.
Fitting rooms, hours and closed days
- Store hours and Closed days (holidays, market trips) are in Settings. The day calendar runs from an hour before your earliest opening to an hour after your latest closing; pick your own under Calendar hours in Settings.
- Fitting rooms and Appointment types (with their usual length) are in Settings, for owners and managers.
- Breaks between appointments: in Settings, Appointment types, set the minutes a type needs after it (cleanup, steaming, putting gowns back). It starts at 0. Open times leave the break free, and booking into it asks first.
Blocking a room
- On the day view, drag down a room's column over the times you want (managers and owners), and pick Block the room then. Or press Block a room.
- Pick Certain dates (from, through) or Every week (the days, when it starts and when it ends; leave the end empty for no end).
- Pick All day or the times, and say why (it shows on the calendar).
- Press Block room. If brides are already booked in that room then, the POS lists them; they stay booked so you can move them.
Blocks show striped on the day view and under each day in the week view. Click one to change it or press Remove block; a weekly block made for several days changes together. Removed blocks are kept in the History. Dragging and choosing Book an appointment then books that length instead.
The waitlist
- Under the calendar, open Waitlist and press Add to waitlist.
- Pick the customer, the kind of appointment, and the day and times she can do (leave them empty for any).
- When a matching appointment is canceled, she shows up under the waitlist. Press Offer by email or Offer by text, or call her.
- Press Booked once she takes it, or Take off to remove her.
Customer interview forms
Her pre-visit questions (Settings, Your website) can be filled in or changed at the store. Open her appointment, then Before her visit, Fill in at the store. Or use the Interview box on her customer page.
Print interview prints one clean page with your store's name, address and phone at the top. Blank form prints the questions with lines to write on, for a walk-in. Every change is kept in the history.